Understanding Git (Part I): The VERY Basics!
Git is an awesome tool to version control your coding project. It tracks changes in your project files and helps coordinate how changes from many developers are put together. However, Git comes across as an over-complicated and difficult-to-use tool for newcomers. It appears to have a million ways of doing things and a two million ways to shoot-yourself-in-the-foot. The good news is that we can skip all the Git-pain! But we need to have a basic understanding of how Git works…
In this post, I will explain those basic ideas that I wished someone had explained to me 10 years ago when I started using Git. In a later posts, I will introduce other Git features and describe the Git workflow that many open-source projects hosted in (e.g.) GitHub or GitLab normally use.
Note that this is not a step-by-step tutorial on how to use individual Git commands – you can find that from plenty of sources! The goal of my posts is to describe, at a high-level, how Git works and take a tour of some of its key features. My hope is that after reading these posts you will understand enough of Git to know which feature works best for which situation in everyday usage without wrecking your repository!
NOTE: These are the post in the Understanding Git series:
Versions, Commits and Graphs
Coding takes a lot of effort! So hardware and software projects are developed incrementally over many (many!) years. Versions of the project will be released from time to time for users to, well…, use. A new version of the project may include new features, bug fixes, etc when compared to the previous version. Since coding projects are basically file repositories, a new version of the project makes changes to the files from the older version. Git tracks these changes in something called commits.
Lets consider an example. Imagine that I have a Git repository called crash
that has a single file: the venerable main.c. Lets say that so far I only
released version 1.0. I then develop a new feature and end up making some
changes to main.c and create a new file foo.c. I am happy with my changes
and would like Git to know about them, so I create commits tracking them. The
new commits are part of version 2.0 of my project.
I create more commits as I continue to change and release crash. The project
starts to have a Git history that we can visualise in a graph as shown below.

Git history of a project with four commits.
Creating Commits
Creating a commit is dead-easy! Run git add from the command line to let Git
know which changes you would like to add to your commit; this is called
staging. You can check which files are changed or staged with git status.
Then create the commit using git commit. Git will open your favorite text
editor where you can type a message describing what changes you are
introducing. For example, you can commit changes in foo.c and all files in a
directory bar/ like this:
git add foo.c ./bar
git commit
The commit message should be helpful, so do not just type ‘changes’ or ‘version 1’! Here are some guidelines on how to write good commit messages.
Anatomy of a Git Commit
The code below shows the contents of an old commit that I created while working on an open-source project (see here). The commit has four components:
- The first line is an ID unique to each commit. Git generates this number by taking a SHA-1 hash of the repository contents.
- The second and third lines state the author and when the commit was created.
- The commit message is the text after the date line and before the line with
diff. The message is usually shown indented and may be multiple lines long. - The remaining of the file shows the changes that this commit makes. Each
file is shown in a separate
diffblock. Among other things, the diff states the lines that change between@@, added lines preceded by+and removed lines preceded by-.
You can view commit information using git show <commit_id>.
commit a685d4f28dce5ad6aeba3308514b8a5b6008ca0b
Author: Andres Amaya Garcia <andres.amayagarcia@arm.com>
Date:   Sun Dec 9 19:13:01 2018 +0000

    Add MBEDTLS_ERR_SHA1_BAD_INPUT_DATA to error.{h,c}

diff --git a/include/mbedtls/error.h b/include/mbedtls/error.h
index 0c3888987..57bbfeb6e 100644
--- a/include/mbedtls/error.h
+++ b/include/mbedtls/error.h
@@ -74,7 +74,7 @@
  * MD4       1                  0x002D-0x002D
  * MD5       1                  0x002F-0x002F
  * RIPEMD160 1                  0x0031-0x0031
- * SHA1      1                  0x0035-0x0035
+ * SHA1      1                  0x0035-0x0035 0x0073-0x0073
  * SHA256    1                  0x0037-0x0037
  * SHA512    1                  0x0039-0x0039
  * CHACHA20  3                  0x0051-0x0055
diff --git a/library/error.c b/library/error.c
index eabee9e21..564490e58 100644
--- a/library/error.c
+++ b/library/error.c
@@ -855,6 +855,8 @@ void mbedtls_strerror( int ret, char *buf, size_t buflen )
 #if defined(MBEDTLS_SHA1_C)
     if( use_ret == -(MBEDTLS_ERR_SHA1_HW_ACCEL_FAILED) )
         mbedtls_snprintf( buf, buflen, "SHA1 - SHA-1 hardware accelerator failed" );
+    if( use_ret == -(MBEDTLS_ERR_SHA1_BAD_INPUT_DATA) )
+        mbedtls_snprintf( buf, buflen, "SHA1 - Invalid input data" );
 #endif /* MBEDTLS_SHA1_C */

 #if defined(MBEDTLS_SHA256_C)
Branching and Merging
Imagine that a crash user finds a bug in version 3.0 after I started working
in version 4.0 as shown below. Its a security issue and I need to work fast to
release version 3.1 – i.e. version 3.0 plus the fix minus all version 4.0
changes. How do I keep track of my partial version 4.0 changes while I develop
version 3.1?
Git has a great feature to get around this conundrum: branches. In a
nutshell, a branch is a pointer to a commit in the Git history. Developers can
create any number of branches, but by default, all repositories have an aptly
called main branch (a.k.a primary or master) where most of the
development changes occur. So I can create a version-3.1-fix branch from the
commit with all version 3.0 changes. After developing my fix and releasing
crash 3.1 my Git
history looks like this:
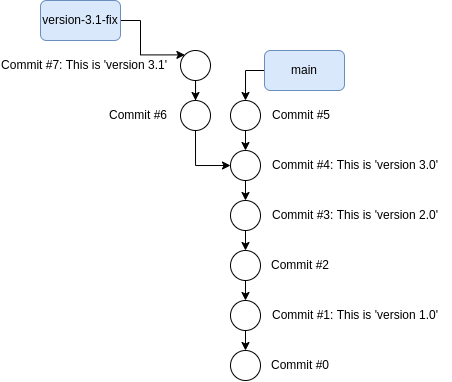
Branch version-3.1-fix created off Commit #4.
Yay! I fixed the security bug via branch version-3.1-fix. However, a future
version 4.0 would not include the security fix because the changes from branch
version-3.1-fix are not in main! We can sort this out by merging
version-3.1-fix into main: this creates a new commit in main that tracks
all the changes from main and version-3.1-fix as shown below.
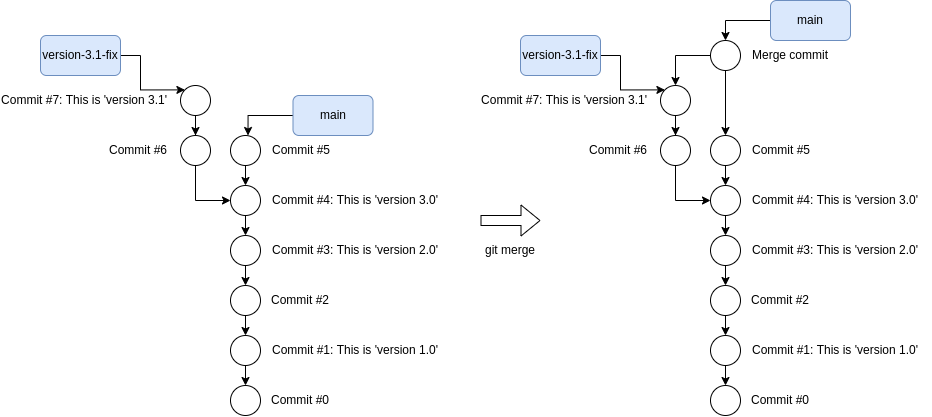
Before and after merging branch version-3.1-fix into main.
Checking Out, Creating and Merging Branches
Running git branch will show a list of branches and * next to the branch
you are currently at. You can create a new branch at the current commit with
git branch <branch_name> and you can checkout, i.e. change to another
branch, using git checkout <branch_name>.
To merge a branch, ensure that you checkout the branch that will contain the
merge commit, then run git merge. For example, I can merge branch
version-3.1-fix into main like this:
git checkout main
git merge version-3.1-fix
NOTE: Sometimes merging gives raise to conflicts if the branches being merged both include commits changing the same files. Here is a good tutorial on how to resolve merge conflicts.
Rebasing
Later on, while developing crash 4.0, I had a shift in priorities. I started
developing a super-crash feature that I later had to abandon due to time
constraints in my release cycle. I did not want to throw this work away, so
I put the partial super-crash changes on its own branch and continued creating
commits in master. My history now looks like this:
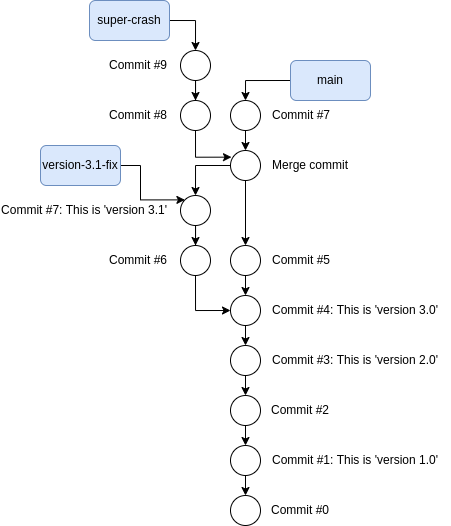
Branch super-crash diverted from main, i.e. there are commits (Commit #7) in main that are not in super-crash.
However, it turns out that version 4.0 must include super-crash because
my troublesome users really want that feature (perhaps they threatened to stop
using crash if I refused!). Merging branch super-crash into main is not
a great option because it would create yet another merge commit which I really
want to avoid – it makes it harder to navigate my Git history. Thankfully, Git
has another great feature to deal with this problem: rebasing.
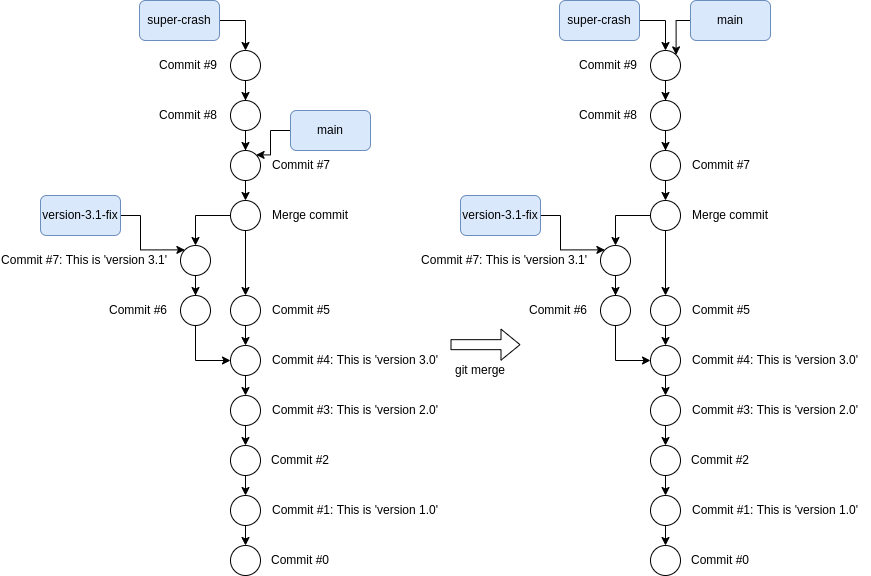
We can say that Merge commit is the base commit of super-crash if I created
that branch off commit Merge commit. Rebasing simply changes the base of the
branch making it look like I started working on super-crash off another
commit in main – in this case Commit #7 as shown below.
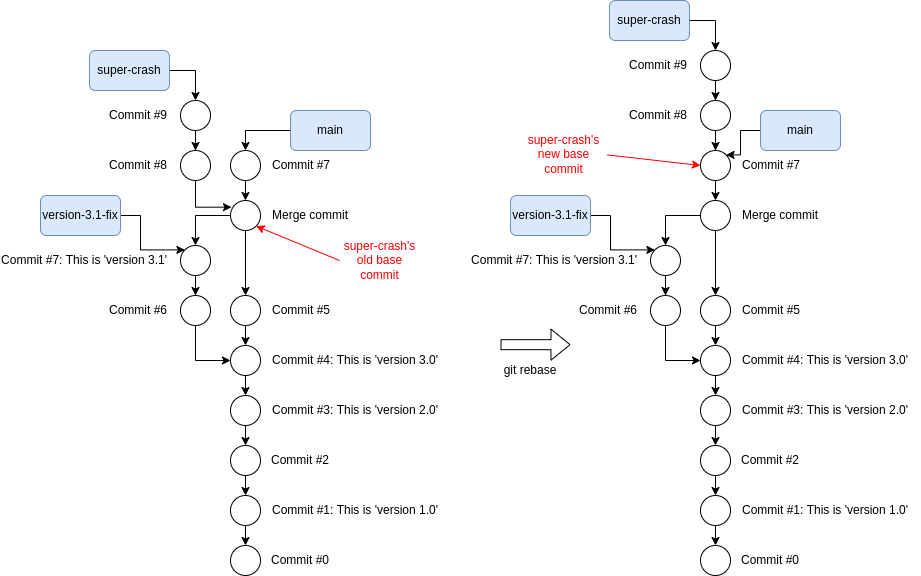
Before and after rebasing branch super-crash on top of main.
I can then fast-forward main such that both super-crash and main
branches point to exactly the same commit like this:
Before and after fast-forwarding main.
Rebasing and Fast-Forwarding
Make sure you are currently on the branch whose base is going to change. Then
run git rebase <new_base>. For example, we can rebase super-crash on top
of main like this:
git checkout super-crash
git rebase main
We can then fast-forward main to match super-crash like this:
git checkout main
git merge super-crash
Git will fast-forward, instead of creating a merge commit, because
super-crash contains all commits in main plus a few new ones.
NOTE: Sometimes rebasing gives raise to conflicts because the new base commit includes changes to the same files that the branch being rebased also changes. Here is a good tutorial on how to resolve rebase conflicts – the idea is generally the same as resolving merge conflicts.
Navigating Git History
As we discussed, Git allows you to view, a.k.a checkout, the files in the
repository at one commit only. For example, git checkout main will checkout
the files at the latest commit that the branch main references. But it is
often necessary to navigate the Git history and checkout arbitrary commits, for
example, while debugging. You can view a summary of the Git history of the
current commit with git log. Here is some example output:
commit a685d4f28dce5ad6aeba3308514b8a5b6008ca0b (HEAD)
Author: Andres Amaya Garcia <andres.amayagarcia@arm.com>
Date:   Sun Dec 9 19:13:01 2018 +0000

    Add MBEDTLS_ERR_SHA1_BAD_INPUT_DATA to error.{h,c}

commit f7c43b3145b2952a0bc0e5fe4584df4bf47fe67e
Author: Andres Amaya Garcia <andres.amayagarcia@arm.com>
Date:   Sun Dec 9 19:12:19 2018 +0000

    Add parameter validation to SHA-1
This is showing that I currently checked out commit a685d4f28..., hence why
(HEAD) is next to the ID, and an earlier commit f7c43b31.... You can
checkout an arbitrary commit using git checkout <commit_id>.
Again, we can only view the repository files at one commit. So it is sometimes
helpful to view the differences between two arbitrary commits in the Git
history using git diff. For example, git diff main..super-crash will show
you the differences in the repository, in diff format, between the latest
commit in branch main references and the latest commit in branch
super-crash.
Conclusion
We discussed the VERY basics of Git in this post. You should now have a rough idea about commits, branches, merging and rebasing. In the following posts, we will build on this knowledge to understand how Git helps versioning when a project is developed concurrently by many programmers. We will also discuss the workflow that many Git open-source projects use.