Understanding Git (Part II): Working with Remotes
In this post, I explained the very basics of Git. There was only one repository in your local machine and only one person making changes. That is well and good, but in practice many programmers contribute to a project: each needs a copy of the repository and many changes are made simultaneously. Version controlling these distributed projects is a big problem that Git solves brilliantly!
In this post, I will explain how this works and how you can use Git remote repositories without shooting-yourself-in-the-foot. I only assume that you are already familiar with the very basics of Git like commits and branches.
NOTE: These are the post in the Understanding Git series:
Remotes
Git relies on servers to version control a distributed project. The server
manages the order in which changes are versioned and provides a consistent
view of the files in the repository. The Git server also allows programmers to
download local copies of the repository using the git clone <address>
command.
Nowadays, it is popular to host Git repositories on the internet using websites like GitHub, GitLab or BitBucket. The website acts as the Git server for a project. For example, I can make a local copy of RISC-V’s Spike’s simulator, which is hosted in GitHub, like this:
git clone https://github.com/riscv-software-src/riscv-isa-sim.git
On success, Git will download, a.k.a clone, the repository and store it in my
computer at a directory called riscv-isa-sim. As discussed before, Git
repositories have a main branch which is called master in Spike’s case, so
Git will checkout that branch right after cloning. You can check that with git
branch.
From Git’s point of view, your clone is just a local copy of the repository
which tracks Spike’s remote repository in GitHub. You can check this with
git remote that outputs the following for my Spike clone:
$ git remote -v
origin  https://github.com/riscv-software-src/riscv-isa-sim.git (fetch)
origin  https://github.com/riscv-software-src/riscv-isa-sim.git (push)
After cloning, you will contact the repository for either of two reasons. You
can upload, a.k.a push, new commits, i.e. changes, that you made or you can
download, a.k.a fetch, commits that others have pushed to the remote since
the last time you fetched. git remote is telling us that Git will contact
the server at that HTTPS URL for either pushing or fetching. Git helpfully calls
the remote origin so we do not have to keep typing that long URL!
Branches and Remotes
Recall that a branch is simply a pointer to a commit and that you can create
an arbitrary number of branches with git branch. Newly created branches are
only local to your repository until you push them to the Git server. In fact,
there are two sets of branches in my Spike clone repository: your local
branches and the remote’s branches! You can see all branches with:
$ git branch -a
* master
  remotes/origin/HEAD -> origin/master
  remotes/origin/confprec
  remotes/origin/cs250
...
The first line of output says that there is a local branch called master that
is currently checked out, hence the *. If I were to create a new commit at
this point, master would point to the new commit. The following lines start
with remotes/origin/ meaning that these branches belong to the remote called
origin i.e. the GitHub remote repository. Line 2 is special for two reasons:
origin/masteris the server’smasterbranch.remotes/origin/HEADindicates the remote branch checked out when cloning.
When we said that Git “checked out” master after cloning, what happened is
that Git saw that remotes/origin/HEAD pointed to origin/master, so it
created a local branch, i.e. a pointer, called master which points to the
same commit that origin/master references.
You can create local copies of other remote branches with git checkout. For
example, git checkout confprec will create a local branch confprec pointing
to the same commit that origin/confprec does. You can also checkout the
commit that origin/confprec points to with git checkout origin/confprec.
However, you cannot directly make a remote branch point to another commit
(e.g. by using git commit) because git checkout origin/confprec will
actually set the repository into detached state like this:
$ git checkout origin/confprec
Note: switching to 'origin/confprec'.

You are in 'detached HEAD' state. You can look around, make experimental
changes and commit them, and you can discard any commits you make in this
state without impacting any branches by switching back to a branch.
...
$ git branch
* (HEAD detached at origin/confprec)
  master
Multiple Remotes
You can configure an arbitrary number of remotes in your local repository. Each
remote will have its own set of remote branches. For example, there would be
three sets of branches if I had two remotes: one set of local branches and two
sets of remote branches. Again, recall that remote branch names are prefixed
with the remote’s name so that <remote_name>/master is a remote branch while
master is a local branch.
I will discuss why having multiple remotes helps and how to use them in a future post.
Pushing to Remotes
As we discussed, we cannot directly modify the remote’s branches in our local repository, so how do we create new commits and push them to the server? The process is actually very simple:
- Checkout a local branch, for example,
git checkout master - Make your changes
- Create a new commit in
masterwith the changes usinggit addandgit commit, and perhapsgit mergetoo! - Run
git push <remote_name> <branch_name>, sogit push origin masterin this case.
After running git push, Git automatically understands that your local
master branch is tracking the remote’s origin/master branch, so Git will
upload any new commits to the server and set origin/master to point to the
same commit as master as shown below. In the case that you are pushing
commits in a new branch my-new-branch that the server does not know about,
Git will upload the new commits and create a origin/my-new-branch branch.
Once you pushed, anyone will be able to see your new commits, and potentially a
new branch, in the Git server.
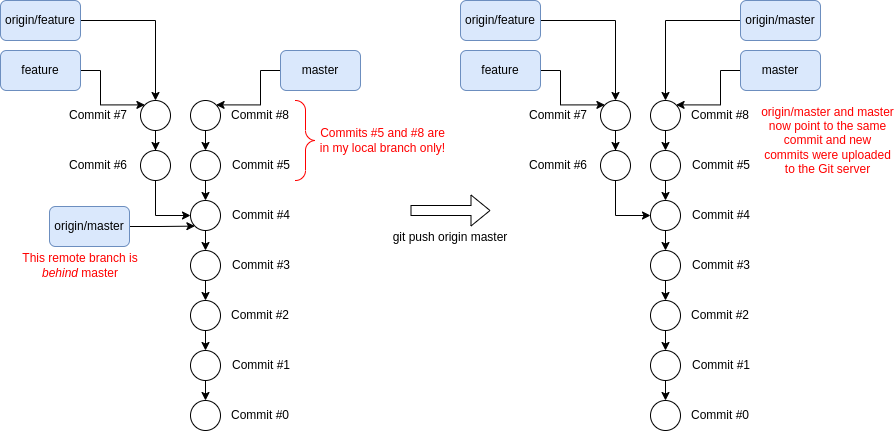
Before and after pushing new commits in the local master branch to the Git server at origin.
git push will throw an error if you try to push commits to a remote branch
that cannot be fast-forwarded. For example, this occurs when another programmer
pushes a commit to origin/master before you push your own changes in the
local master branch; in other words, origin/master and master diverged
as shown below. If this happens, simply fetch from the remote (see below!),
update your local branch with the latest changes (using, e.g., git merge or
git rebase) from the remote branch that it is tracking and try to push again.
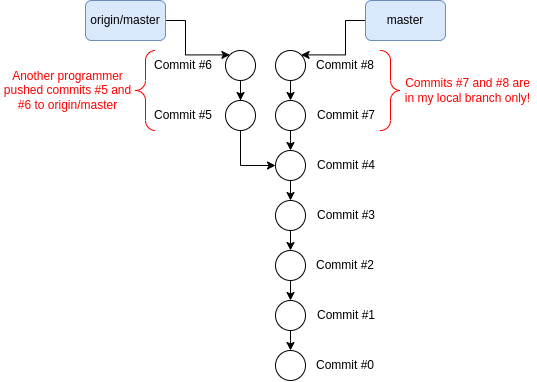
git push fails because origin/master and master branches diverged.
Fetching From Remotes
We obviously want to regularly download the latest changes that others have
pushed to the server. We can do that with git fetch, for example, git fetch
origin in the case of my local Spike repository. Git will download the latest
commits from the server and update the remote branches i.e. the branches
prefixed with origin/.
After git fetch, the remote branches in my local copy of the repository are
synchronized with the server, but my local branches will be left untouched as
shown below.
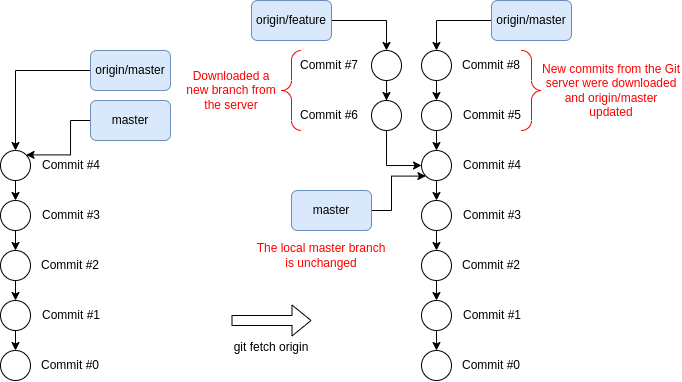
Git history before and after git fetch origin. New commits and branches are downloaded from origin while local branches are unchanged.
You can update your local branches to point to the latest commit if you wish to
with git merge or git rebase just as discussed in this previous post. For example, the figure
below shows the history of a repository before and after fetching and merging
with:
git fetch
origin
git checkout main
# Fast-forward main to reference the same commit as origin/main
git merge origin/main

Git history after fetching from origin and fast-forwarding master to reference new commits in origin/master.
Pulling: Fetching + Merging
git pull is a convenience command that combines the fetching and
merging/rebasing functions into one (see documentation
here). I seldom use it because I rarely
ever update my local branches! I will explain why in a future post. I also
think that git pull does a lot behind the scenes and this tends to trip new
users, so I would recommend that you avoid it if you are new to Git.
Visualizing Git History
It can sometimes be helpful to visualize your Git history as the project grows
with many commits, branches and remotes. Of course, you can use the venerable
git log (see documentation here), but
there are also many tools to assist you with this, such as
gitk, GitKraken
or Sourcetree. My favorite visualizer is
tig, which stands for Text-mode Interface for
Git, because it is light-weight, easy-to-use and works directly in the
terminal. Here is a great blog
post about tig if you are interested!
Conclusion
You should now be familiar with how Git tracks remote repositories using branches if you made it this far. We also covered how you can clone repositories from a server as well as fetch the latest changes and push your new commits to the server. In the next post, I will describe the workflow that many Git open-source projects use.